How To Create Subdomain In Hostinger (2026 Guide)
Last Updated 13 September 2026 by Jarvis Silva
Subdomains allow you to organize, categorize, and expand your web presence without buying separate domain names. Whether you want to launch a blog (blog.yourdomain.com), an online store (shop.yourdomain.com), a member portal, or a private staging site (staging.yourdomain.com), Hostinger makes creating subdomains effortless.
⚡ Quick Answer: How to Create a Subdomain in Hostinger
- 1Log in to Hostinger hPanel (
hpanel.hostinger.com) and click Manage next to your website. - 2In the left sidebar, click Domains > Subdomains.
- 3Enter your subdomain prefix (e.g.
app,dev, orstore) in the Subdomain field. - 4Click Create. Hostinger automatically builds the directory at
public_html/subdomain_nameand issues a free SSL certificate.
Don't Have A Hostinger Account Yet?
Get up to 75% Discount On Web Hosting Plans + 3 Months FREE, Free Domain, and 100 Free Subdomains.
Step 1: Create Subdomain in Hostinger hPanel
- Log in to your Hostinger account and navigate to the dashboard of the website where you want to create the subdomain.
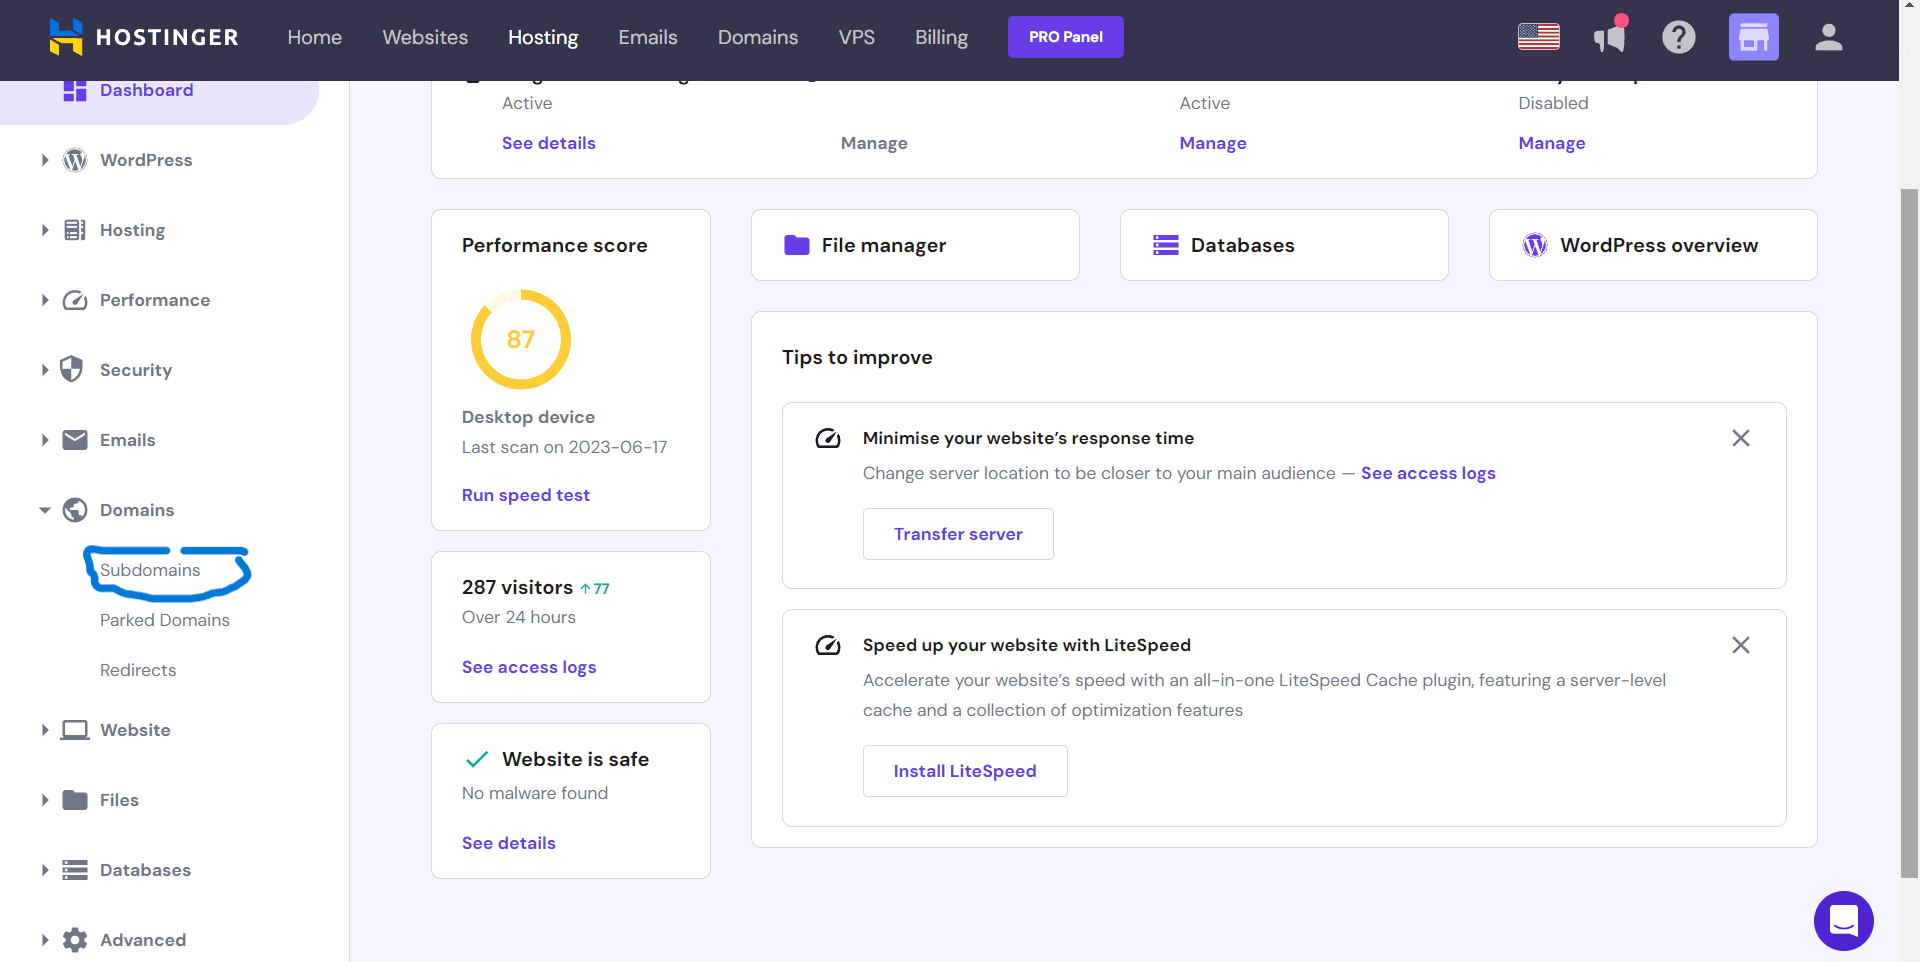
- In the left sidebar menu, look under the Domains section and click on Subdomains.
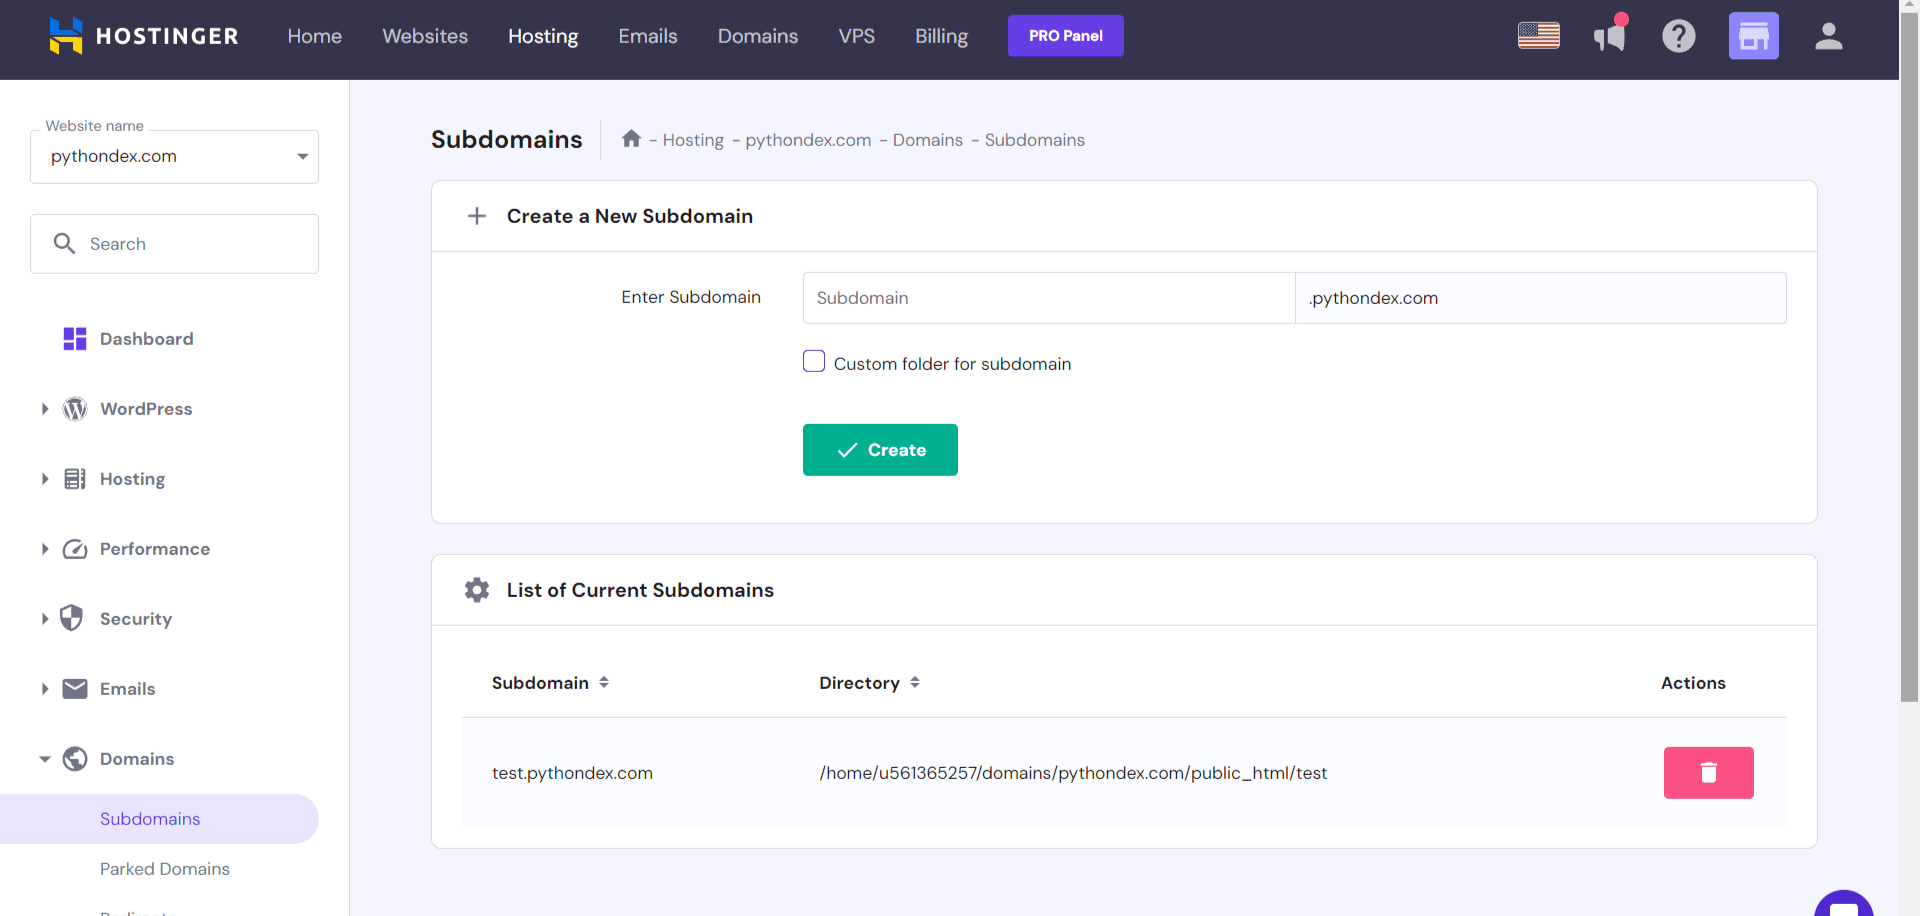
- In the Create a New Subdomain section:
- Enter the subdomain name you want to create (e.g.
blog). - By default, Hostinger will check Custom folder for subdomain and set it to
public_html/blog. You can keep this default or specify a custom folder. - Click the purple Create button.
- Enter the subdomain name you want to create (e.g.
- Hostinger will instantly create the subdomain and show a success message. It will also appear in the List of Current Subdomains table at the bottom of the page.
Step 2: Subdomain DNS Configuration
Depending on where your domain's DNS is managed, here is how DNS resolution works:
- If your domain uses Hostinger Nameservers: You do NOT need to do anything! Hostinger automatically writes the necessary A and CNAME records into your DNS zone. The subdomain will start resolving within a few minutes.
- If your domain is managed externally (Cloudflare, GoDaddy, Namecheap): You need to manually add an A Record in your domain registrar's DNS settings pointing your subdomain to your Hostinger server IP:
| Record Type | Name / Host | Points To / Content | TTL |
|---|---|---|---|
| A | your_subdomain (e.g. blog) | Your Hostinger Server IP | Auto / 300s |
Below is an example of adding the subdomain DNS record inside Cloudflare:

Step 3: Uploading Files or Installing WordPress
Now that your subdomain is created and routed, you can start building:
- Uploading HTML / PHP Files: Open Hostinger's File Manager, navigate into
public_html> your subdomain directory (e.g.,public_html/blog), and upload your code or static assets. - Installing WordPress on the Subdomain: In hPanel, go to Websites > Auto Installer, select WordPress, and in the domain dropdown selector, choose your newly created subdomain (e.g.,
blog.yourdomain.com). Hostinger will install a fresh WordPress instance isolated to that subdomain. - Checking DNS Propagation: Test your subdomain using a tool like Ping.eu or DNSChecker. Most DNS changes resolve within 15 minutes, but can take up to 24 hours globally.
Frequently Asked Questions
How many subdomains can I create in Hostinger?
Hostinger allows you to create up to 100 subdomains per domain name on Premium, Business, and Cloud hosting plans. On the entry Single plan, up to 2 subdomains are supported.
Do Hostinger subdomains get a free SSL certificate?
Yes. Hostinger automatically installs a free, lifetime Let's Encrypt SSL certificate on every newly created subdomain. SSL activation typically takes 5 to 15 minutes after DNS resolves.
Where are subdomain files located in Hostinger File Manager?
By default, Hostinger creates a dedicated folder inside your root directory at 'public_html/subdomain_name'. You can also specify a custom directory during subdomain creation.
Do I need to add manual DNS records for a Hostinger subdomain?
If your domain uses Hostinger nameservers (ns1.dns-parking.com, ns2.dns-parking.com), Hostinger automatically adds the required A and CNAME records to your DNS zone. If your domain uses Cloudflare or external nameservers, you must manually add an A Record pointing your subdomain name to your Hostinger server IP.
How do I install WordPress on a subdomain in Hostinger?
In hPanel, navigate to Websites > Auto Installer > WordPress. In the installation form, expand the 'Advanced' or domain selector dropdown, choose your newly created subdomain (e.g., blog.yourdomain.com), and click Install.
Creating subdomains on Hostinger is quick, flexible, and completely free. Check out our related Hostinger guides below to optimize your site!
About the author
I am Jarvis Silva, a tech enthusiast. I have 5 years of experience in website hosting and development, Now sharing all my knowledge related to web hosting and other various tech on the internet through Hostwizly.
