Host Django Website On Hostinger VPS
Last Updated 06 May 2025 by Jarvis Silva
Want to know how to deploy a Django project to Hostinger VPS then you are at the right place. This article will provide a detailed step by step guide on how to host Django website on Hostinger VPS.
In this tutorial, I will cover everything from setting up a VPS in Hostinger, Installing the necessary software and libraries, setting up nginx, connecting domain, installing SSL and setting up the firewall.
Prerequisites
- A Hostinger VPS plan.
- Basic knowledge of the command line and SSH
- A Django website project to host.
By the end of this article, you will have a fully functional Django website hosted on Hostinger.
STEP 1: Get & Setup Hostinger VPS
To host a Django website on Hostinger you need to get their VPS plan as you cannot host Django website on shared hosting.
If you want to compare broader options before choosing one, browse these top VPS hosting providers.
If you don’t have a VPS plan yet, you can purchase one using this discount link: Get Hostinger VPS.
After purchasing a VPS Plan follow below steps to setup it:
- Login to your Hostinger account, click on your VPS Hosting and click on Setup which initiate the setup
- First it will ask to Select your Server Location. Choose the one which you fill is the closest to your audience.
- Next, It will ask to Choose Operating System, Plain OS and then choose Ubuntu.
- Lastly it will ask to Setup your VPS Name and Root Password. Set strong root password and store it securely.
This will setup your VPS on Hostinger
STEP 2: Obtain VPS Details At Hostinger
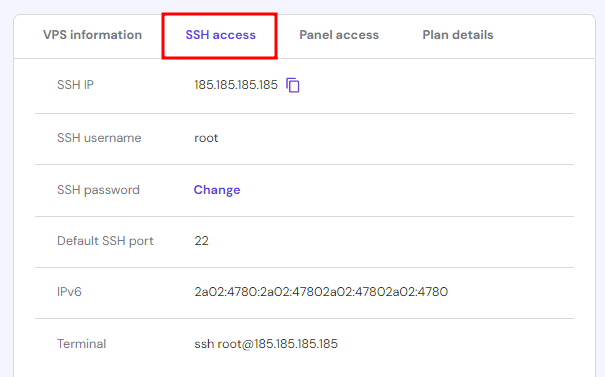
We need to obtain the IP address, Username and Password of the VPS For using SSH so to obtain this follow below steps:
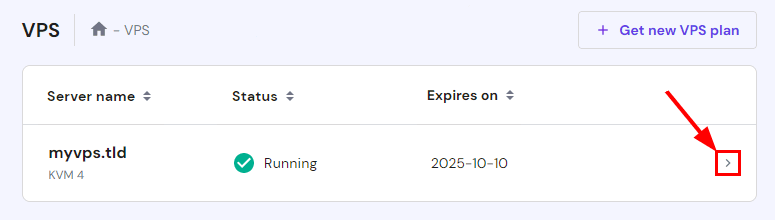
- Login to your Hostinger account and Navigate to the VPS Section to access your server.
- In your VPS dashboard choose the server you want to connect to.
- On the overview page, Go to VPS Access > SSH Access. Here you will find the SSH details required for connecting to the server. Note the username, ip address and SSH password if you don't know then change it by clicking on change.
STEP 3: Connect To Hostinger VPS Using SSH
We have obtained the SSH Details of our VPS now to connect to the server we will have to use a SSH Client we can use Putty on windows or Terminal on macOS/linux.
To connect to server follow below steps:
For Windows
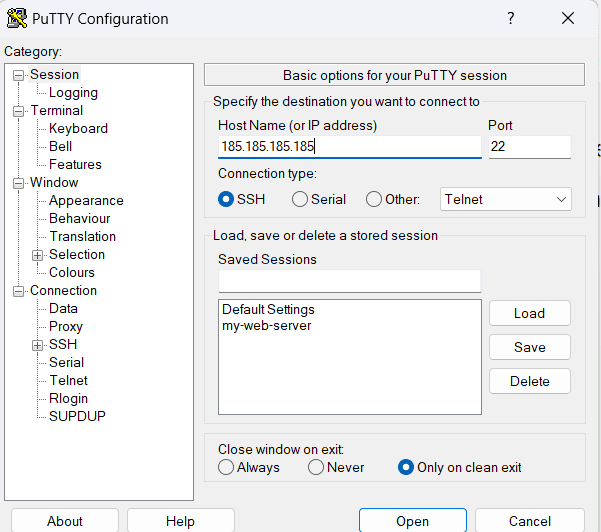
- Download and Install Putty SSH Client. To download go here: Download Putty.
- Open Putty. In the Hostname enter your vps ip address and click on open.
- It will open a terminal and ask you to enter your username and password (For security purpose password will not be shown when you type it). Enter the correct credentials of your VPS and you will be logged in to the server.
For MacOs and Linux
- Open your Terminal.
- Run the below command. Replace username and ip address with your VPS username and ip we obtained earlier in Step 2.
- It will prompt you to enter your username and password (For security purpose password will not be shown when you type it). Enter the correct credentials of your VPS and you will be logged in to the server.
ssh username@<vps_ip_address>So everytime you want to login in to your server you can use the above method. Now we can start setting up the environment for hosting Django website.
STEP 4: Installing Required Softwares & Libraries
To run a Django website on VPS Server we need to install various packages on our VPS such as Python, PIP, VENV, Nginx and GIT. So let's install each one by one.
1. Update the server
It is a good practice to update the server package list and upgrade all installed packages so use run below command on your server.
sudo apt update
sudo apt upgrade -y
2. Install Nginx Server
Nginx is a popular web server which we will use as a reverse proxy to pass requests to the Django application. To install run below command:
sudo apt install nginx -yStart Nginx server
sudo systemctl start nginx
sudo systemctl enable nginx
Now if you visit your server ip address you should see the default nginx welcome page which means your server is running.
3. Install Python3 & Pip
As we need python to run Django we need to install python and pip for installing python packages.
sudo apt install python3 -y
sudo apt install python3-pip -y
The above commands will install python3 and pip on your server, to verify the installation run the below command:
python3 --version
pip3 --version
The output should display the installed versions of Python and pip.
4. Upload your Django Project to VPS
- Create your project folder at var/www/your-project-folder-name. Here we will upload all our Django website code. Replace your-project-folder-name with your desired project folder name.
- To upload the code you can use GIT or SCP.
cd /var/wwwmkdir project-folder-nameTo upload using GIT (Recommended):
sudo apt install git -ycd /var/www/your-Django-project-foldergit clone repo-url .To upload using SCP:
On your local machine run the below command
scp -r /path/your-project-folder username@your_ip:/var/www/your-project-folderReplace /path/Django_project with the path to your local project. Replace username and your_ip with your VPS username and IP address.
5. Setting up the project on VPS
- First install virtualenv in python which allows us to isolate python packages from server packages. To install use below command:
- Activate the virtual environment:
- Install Django dependencies:
- Configure settings.py
- Add Server IP to ALLOWED_HOSTS:
- Set Up Static Files Directory:
- Collect Static Files:
- Run the Django Server:
pip3 install virtualenvcd /var/www/your-Django-project-foldervirtualenv venvsource venv/bin/activatepip install -r requirements.txtIf you don't have requirements.txt file create one in the project directory and add all the names of dependencies.
nano /var/www/your_project_folder/settings.pyALLOWED_HOSTS = ['your-server-ip']STATIC_ROOT = os.path.join(BASE_DIR, 'static/')python manage.py collectstaticpython manage.py runserver 0.0.0.0:8000Now if you try to access your website at http://your_vps_ip:8000 you will not see it running as we have not yet configured nginx so let's configure it.
6. Configure Nginx Server
- Create a New Nginx Configuration File:
- Add Configuration Settings:
- Enter your_server_ip_address at server_name
- Enter your-project-folder-name at alias /var/www/your-project-folder-name/static/
- Enter your-project-folder-name at alias /var/www/your-project-folder-name/media/
- Save and Exit: (CTRL + X, then Y, then Enter).
- Create a Symbolic Link:
- Test the configuration:
- Restart Nginx server:
- Rerun your Django website server:
sudo nano /etc/nginx/sites-available/your-project-folder-nameserver {
listen 80;
server_name enter_your_vps_ip_or_domain;
location / {
proxy_pass http://127.0.0.1:8000;
proxy_set_header Host $host;
proxy_set_header X-Real-IP $remote_addr;
proxy_set_header X-Forwarded-For $proxy_add_x_forwarded_for;
proxy_set_header X-Forwarded-Proto $scheme;
}
location /static/ {
alias /var/www/your-project-folder-name/static/;
}
location /media/ {
alias /var/www/your-project-folder-name/media/;
}
}
sudo ln -s /etc/nginx/sites-available/your-project-folder /etc/nginx/sites-enabled/sudo nginx -tsudo systemctl restart nginxcd /var/www/your-Django-project-folderpython manage.py runserver 0.0.0.0:8000Now if you visit at your_ip_address and your Django website should be served. If you want to run the Django website for production follow this tutorial: Run Django for production using Gunicorn.
STEP 5: Connect Domain To VPS
If you don’t already have a domain name, you need to purchase one from a domain registrar. Once you have a domain, configure it to point to your VPS. Follow below steps:
Configure Your Domain DNS
| Name | Type | Address | TTL |
|---|---|---|---|
| your-domain.com | A | your-server-ip-address | 14440 or auto |
| www.your-domain.com | A | your-server-ip-address | 14440 or auto |
Add the above records to your Domain DNS and save. Note it can take around 24 hours to propogate.
Update your Nginx Configuration
sudo nano /etc/nginx/sites-available/your-project-folder-nameModify the server_name directive to your domain name, earlier we have added ip address now replace it with your domain name.
server {
    listen 80;
    server_name your_domain.com;

    location / {
        proxy_pass http://127.0.0.1:8000;
        proxy_set_header Host $host;
        proxy_set_header X-Real-IP $remote_addr;
        proxy_set_header X-Forwarded-For $proxy_add_x_forwarded_for;
        proxy_set_header X-Forwarded-Proto $scheme;
    }

    location /static/ {
        alias /var/www/your-project-folder-name/static/;
    }

    location /media/ {
        alias /var/www/your-project-folder-name/media/;
    }
  }
Now if you visit your website at http://your-domain.com then you should see your Django website serving.
STEP 6: Install SSL
To access the website using https you need to install a SSL Certificate so let's install one using Certbot.
- Install Certbot
- Obtain and install the SSL Certificate:
sudo add-apt-repository ppa:certbot/certbot
sudo apt update
sudo apt install certbot python3-certbot-nginx -ysudo certbot --nginx -d your_domain.com -d www.your_domain.comNow it will install SSL Certificate for your domain, you can now visit your website at https://your_domain.com
STEP 6: Setup Firewall
We will use the pre-installed firewall software UFW. To setup the firewall run below commands
- Allow essential ports:
- SSH (Port 22): To maintain SSH access.
- HTTP (Port 80): For serving web traffic.
- HTTPS (Port 443): For secure web traffic.
- Enable the firewall:
sudo ufw allow OpenSSH
sudo ufw allow 'Nginx HTTP'
sudo ufw allow 'Nginx HTTPS'sudo ufw enable
sudo ufw statusIt will display firewall status as active with all the enabled rules.
Summary
So this was everything for this tutorial, I have covered all the necessary steps, from setting up your server to configuring Nginx, uploading your code, and securing your site with SSL.
Also Read: Host Node JS on Hostinger VPS
I hope you found the guide easy to follow and that you have successfully hosted your Django project on Hostinger. If you ran into any issues a simple google search should able to solve it.
Thank you for reading, Have a nice day 😊
About the author
I am Jarvis Silva, a tech enthusiast. I have 5 years of experience in website hosting and development, Now sharing all my knowledge related to web hosting and other various tech on the internet through Hostwizly.